Spring 2022
PHOT 3190.01
© Bill Barrett 2022
Feedback (general opinions, problems, suggestions, etc.) on this hypersyllabus is encouraged! Bookmark this, but don't rely on printing it out. It is very likely that this page will be updated in the course of the semester.
Class description: Students learn the theoretical and practical aspects of photographic digital imaging. Students develop a theoretical understanding of this technology and learn to apply these principles using Adobe Photoshop. Students learn to control, modify, and manipulate digital photographic images for both corrective and creative purposes.
Learning Outcomes:
We will be using the Macintosh computer platform in class, but students with Windows familiarity are welcome. Cross-platform questions are encouraged, and issues are addressed.
Class attendance is very important this course. Your participation and attendance are a large part of your grade -- make sure both are exceptional. If you miss more than one class, your grade will be affected. If you miss eight class sessions, you cannot pass the course. Written assignments and class presentations must be completed on schedule.
How you're graded: Your final grade is based on your performance throughout the semester. Your attendance and active participation count for 30%; your final projects count for 60% (see note at week nine for details); two exams count for 10%. Doing more than required can earn you extra credit; talk to me outside class if you're interested (but please note that any extra credit work must be approved first, and completed by the end of week 15). This is what the grades mean....
REMINDER: Follow Health and Safety Guidelines!
Students are reminded to follow all COVID-19 health and safety guidelines to help keep our community healthy. The guidelines are outlined on Webster’s COVID-19 web page at: http://www.webster.edu/covid19/healthtips.html.
Before coming to class: One important requirement for all students and faculty is that everyone must complete a Daily Health Screening before coming to class (details at the link above).
In-class expectations: The health and safety guidelines include the following:
· Everyone in a classroom will be required to wear a mask/face covering at all times;
· Maintain social distance in classrooms, including with seating and while entering and exiting;
· Food and drink will not be allowed in class;
· Feeling sick? Do not go to class.
Text (Recommended if you want a good book that covers this material. Not required.)
Martin Evening, Adobe Photoshop CC for Photographers, The actual version in the lab is 20.0.5. |
|
What we're doing and when:
Week 1. (No class on Martin Luther King Day.) The WorldClassRoom portal, and how we will use it in this class.
Introductions; The digital world we are entering; the hardware and the software. Some of the vocabulary in digital imaging might be new to you, though much of it is the same or similar to that in "traditional" silver-based photography. Participating in the Photoshop listerv. (If you are new to on-line discussion groups, read the "rules of the road" before you jump in!).
Units of storage that you need to know:
(Remember, kilometer = 1000 meters, kilogram = 1000 grams) but, once we get to "real" digital...
256 bits in a byte
KB (or K) kilobyte = 1024 bytes
MB Megabyte = 1,048,576 bytes
GB Gigabyte = 1,073,741,824
TB Terabyte = 1,099,511,627,776
PB Petabyte = 1,128,098,930,098,176
Here's an interesting way to think about all those storage terms.
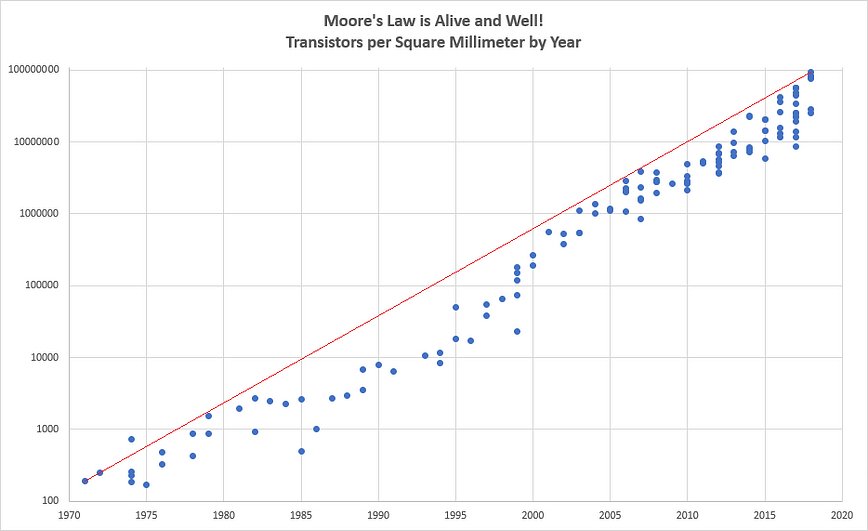
Disk size and storage, continued. Moore's Law (and a graphical representation of it) -- although that may be changing. This BBC podcast "Keeping data forever" from their series People Fixing the World looks at three radical new ways to save data: writing inside glass, saving information to tiny magnets, and using the code of life – DNA – to save files.
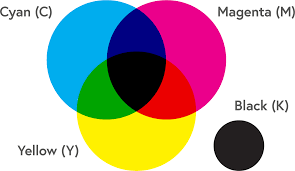
How color is rendered on a computer.
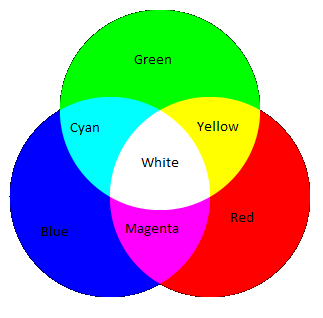 |
Red, green and blue are the additive primary colors. Cyan, magenta and yellow are the subtractive primary colors. So, red + green+ blue light in equal amounts projected on a surface will yield white. The light is added together. Cyan + yellow + magenta ink or pigments block light reflected from them. All three combined block all light, which should be black. (The four color printing process uses black ink in addition to CMY, because in this imperfect world simply combining C+M+Y inks can yield a less perfect, "muddy," result. Thus, CMYK. It is said to stand for "key," and is the last letter of black. B, of course, stands for blue. But we need not worry about that.) |
|
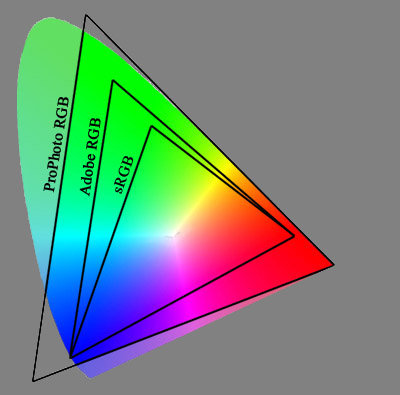
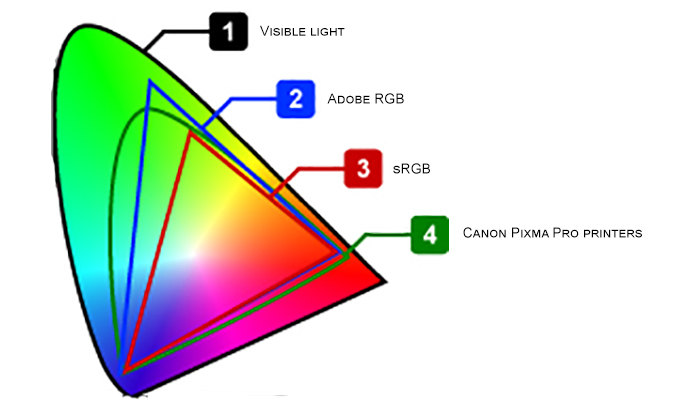
Color spaces for different purposes).
Week 2. No class Monday; I am traveling to a conference. Classes Wednesday and FRiday are on Zoom. See the Zoom tab is WorldClassRoom for the login link.
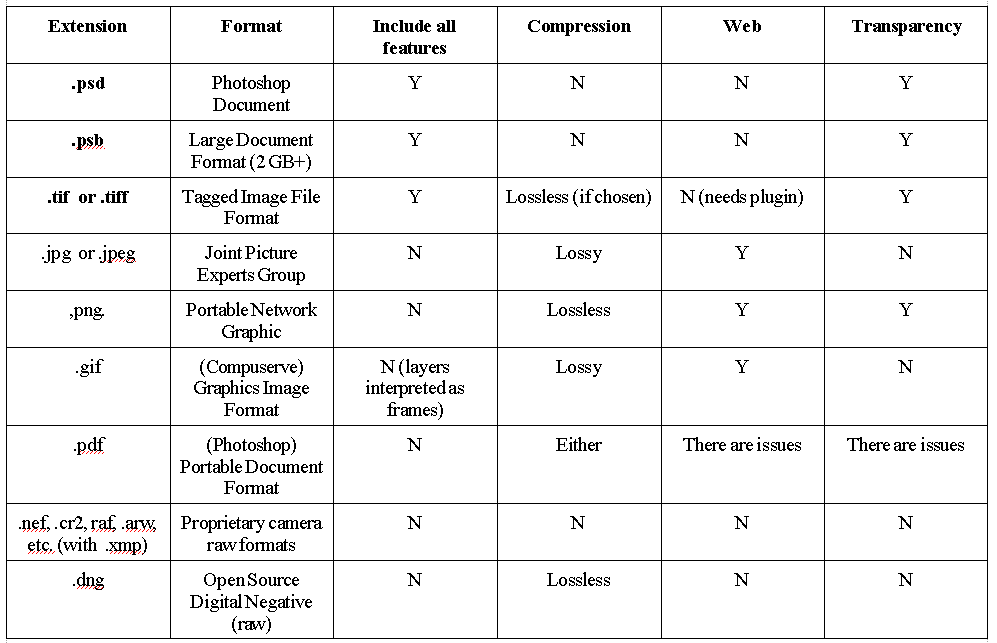
Image file types, and considerations of their proper uses. These are the ones we might encounter in this class.
Adobe Photoshop Lightroom and Photoshop and why both are good ideas (and the critical things you always need to remember when using Lightroom in a lab).Photoshop CC (version in the lab is 20.0.4; current version is 22.0.1) is the primary software we will use for this course. If you need access to the software at home, go to this link -- but be aware that the process may take several days to complete. (And check your Junk folder for a message from JourneyEd, the company that manages the licenses if you don't hear back.)
Let's have a look at Photoshop version 1.0 (which was marketed as Barneyscan XP before Adobe bought it). You will appreciate the current version more and more.
if you have a fully adjustable digital camera of your own, bring it to class on Monday. If not, various Nikon dSLR cameras are available through the Media Center; please check one out before class (you must reserve it ahead of time). What to consider when purchasing a digital camera. Factors affected or determined by chip size. |
 |
 |
 |
| Camera chip size comparison (note that 35mm film is a 24x36mm frame) | Another chip size comparison ("Full frame" is with reference to 35mm.) |
Here is a good guide to chip sizes and diagonals (hence "normal" focal lengths.)
Week 3. Why non-destructive editing is so important. Introduction to the Lightroom Library module. Importing in Lightroom, and taking time to get the presets right.

Week 4. Resetting Lightroom Classic preferences (there is a lot here). The Lightroom Develop module. How to begin work on a digital image. File formats supported by Lightroom.
Camera RAW and EXIF data.
Week 5. The Lightroom Develop module, continued. Black & White treatment options. Collections and Smart Collections.
Week 6. Getting started in Photoshop and the Bridge. What's a Bridge and why can it be my friend? RAW conversion to DNG via the Bridge. The DNG file format (the free DNG converters for Mac and Windows are a bit down on the page under Downloads). Creating and saving metadata templates in Bridge. Troubleshooting problems with the Photoshop program.
Some basic keyboard commands that you need to know. Navigating around the image. The toolbar and the palettes. Selection tools and quick masks. Introduction to channels.
Working with layers: The clone stamp tool and healing tools, and ways to work non-destructively with them. Content aware tools, including scale, fill, patch and move.
Week 7. Working with layers: adjustment layers, layer masks Do NOT use the Brightness/Contrast adjustment (and here is why).
The transform command, levels adjustment layers. Layer masks by painting and by selections. Duplicating layers, layer groups, clipping masks
"Smart objects" and further adjustments with the camera raw filter.
Week 8. We were not able to meet. See following weeks for schedule adjusments.
Spring Break
Week 9. Monday (possiblyon Zoom): Guest speaker: Jennifer Silverberg.
Scanning; using the Epson Expression 10000 XL flatbed scanner. Pay careful attention to scan resolution, and when you have the file in Photoshop, verify that you have a big enough file size at 300 ppi. Send the original scan exactly as it came in before you begin work on it. (There is a tutorial on using the scanner on the class home page in WorldClassroom.)
First, send me the original scan exactly as it came in. Then, convert to .dng on import, and once you open your file in Photoshop, be sure to change image size to 300 ppi without re-sampling. This DNG version is the one you should use if you're going to work on this image.
Get ready for your major projects: try to get an original family photo to restore.
Midterm exam.
Assignment of individual projects. Some details of how to save your projects. What your Class Presentations are about.
Some critically important considerations as you work on your projects: Save all original components of your projects, and label them clearly.
Save projects in uncompressed Photoshop or TIFF format only. (*.psd or *.tif)
Do not flatten layers. Because flattening layers destroys my ability to see your work, project grade is reduced by 50% Your grade for each of the three projects is worth 20% of your final grade for the class, for a total of 60% of the grade. |
When you finish a project, send your work via FTP. In room SV 204, the best way to use FTP is with Fetch. Filezilla, which is available as a free download for both Mac and Windows, is generally a good program outside the lab network. (There is a tutorial on using Fetch on the class home page in WorldClassroom.)
Original file for first project due by the end of the week; send by FTP as instructed. (Note box below for important reminders.) Student presentations of personal project proposals; initial work on first project.
What you should send for your projects Send original files (10% project grade)
Send final projects (80% project grade)
Be sure to label each file appropriately, as noted above. Keep track of what you are doing (80% project grade) See week 12 for what you will need to send in an accompanying text file to document your work so I can understand your process. |
Week 10. Monday: Large file management. Making (and unmaking) layer groups. Clipping masks. The important command that is not in a menu, Merge All Layers on top of all existing layers.
Digital printing (in class_
Week 11. A brief tour of how photography has always lied.
Photoshop and body image (it isn't pretty)
The magic formula for fooling people; the liquify filter. Class presentations; work on projects; use the text as reference as needed..
Wednesday: Photoshop workspaces, saving and reloading your preferences How to create and use actions (and where they are saved).
By now you must start your second project; original files due Wednesday. Class presentations; work on projects. Dynamic tools such as Bird's Eye View (old down h key while zoomed into a file, then click in the picture for a momentary full-screen view; change brush size and hardness (CTRL+OPTION and CTRL+OPTION+CMD respectively).
Week 12. Completed first project due. Make sure you include a document in WorldClassroom describing in detail what you did. Send images by FTP as instructed.
Wednesday: We will look at each project in class. Be prepared to show your original file, and to walk us through the essential steps of your project.
Week 13. By now you must be working on your third project; original files due.
How to make a shadow. Hand coloring. Review of image size, canvas size, and transformations of file and layers.
Week 14. The Output module of the Bridge.
Completed second project due. Make sure you include a document in WorldClassroom describing in detail what you did. Send images by FTP as instructed.
Wednesday: We will look at each project in class. Be prepared to show your original file, and to walk us through the essential steps of your project.
Week 15. Making panoramas.
Course evaluations are now online. Time will be set aside at the beginning of class on Monday to complete them. (You should have already received information about this.) The confidential site to access the online course evaluations is Webster’s MyCoursEval website . Students will use their Connections user name and password to access the course evaluation form.
Class presentations; work on projects.
Week 16. Final Exam Monday, 3:20-5:20 pm. (To be confirmed) Note the schedule change from our usual time!
Completed third project due. Make sure you include a document in WorldClassroom describing in detail what you did. Send images by FTP as instructed.
We will look at each project in class. Be prepared to show your original file, and to walk us through the essential steps of your project.
There is a brief written final exam.